As software engineers, we spend a lot of time debugging and testing our own code before pushing it to the next phase. But how do you test your application’s back-end, to make sure there’s proper validation and to prevent abuse? This abuse can sometimes have severe negative consequences, so it’s crucial to test our application back-end for this.
Why back-end validation?
In a typical web application, we often add front-end validation (often using JavaScript or sometimes plain HTML) to make the user experience a bit smoother. Front-end validation is fast, it gives the user immediate feedback, which is great!
But as you may know, while that’s great for the user experience, it means absolutely nothing for the application’s security. As software engineers, we have to account for the actions of bad people trying to do bad stuff that we didn’t intend.
Other than that, there’s often cases where front-end validation won’t suffice. For example, sometimes, on some e-commerce sites, if there’s an item that’s on sale with limited stocks, and I click “Add to cart”, sometimes I get an error, because the item is already out of stock. Here, the back-end will need to check this and relay it to the front-end.
Okay, so what’s the best way to test it?
Well the best way (or rather the only way, really) is to do what an attacker would do — ignore the front-end validation and test the back-end endpoints directly. In other words, to understand the attacker, one must become the attacker in a sense.
One way of doing this is using an interceptor. An interceptor is a middleware tool, also called a “proxy”, where all your network traffic goes first, from where you can then manipulate it before sending it to the actual servers.
There’s plenty of interceptors out there, but the one I personally use is Burp. Go ahead and download it here. Choose the “Community edition”, this will be more than enough for our purposes.
In order to start intercepting requests, you need to configure your operating system or browser to use Burp as a proxy. One simple way to get started is using Firefox. Make sure you have the latest version of Firefox installed, and then follow the instructions here to set up Firefox’s proxy to Burp.
Once that’s done, let’s start intercepting. Open Burp, click the “Proxy” tag, then the “Intercept “sub-tab, then open http://httpbin.org/get in Firefox. It’s a simple website that shows request headers and other information for debugging HTTP clients. After you open this link, you should see something like this in Burp.
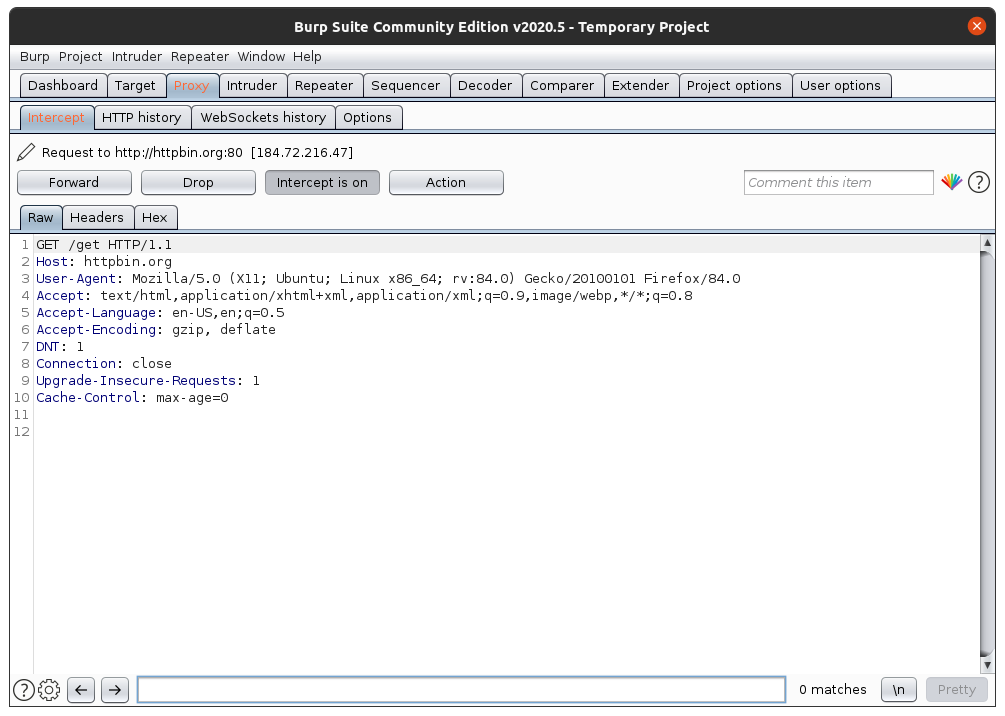
Burp shows us the request that we want to make to http://httpbin.org. It shows all the request headers like User-Agent. If we just click on “Forward”, Burp will send this request as it is.
But we can also change the values. Try to change the value of User-Agent, to, I don’t know, something like “Hacked!” The whole text box under the “Raw” tab is like a notepad, you can edit anything inside it.

Now click “Forward”, and then turn off Intercept by clicking “Intercept is on”. Open Firefox. You should see something like this:
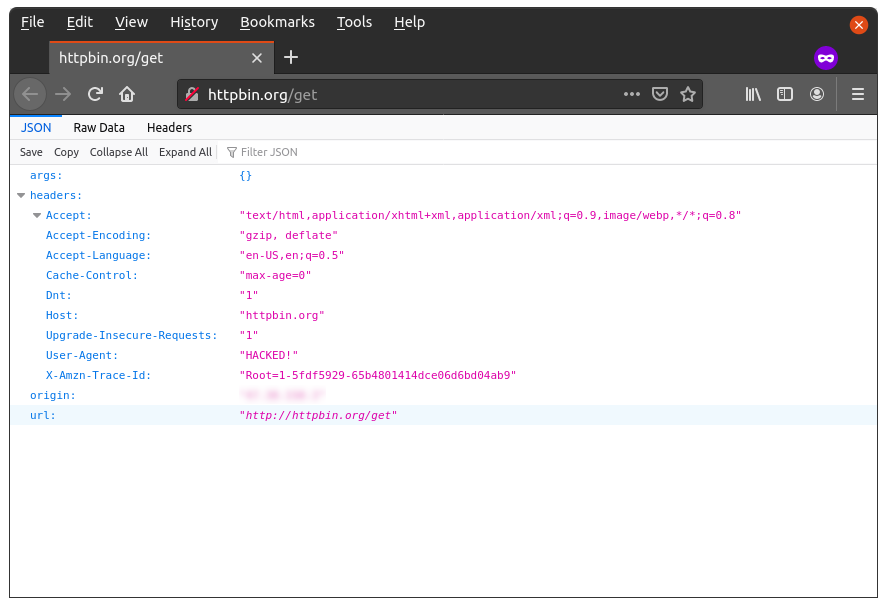
See the “User-Agent” value? You just hacked yourself! Well yeah, this was not that exciting of an example, but I hope it helped you learn how to use Burp. Feel free to experiment with other values in Burp.
Now let’s try using it with a web app that’s a bit more sophisticated. We’ll use a simple Django-based web app that’s basically a contact form. It takes name, email, subject and message, and saves this information into a table. Pretty simple stuff.
Open a terminal and clone this simple Django app:
git clone https://github.com/smtchahal/django-contact-form.gitNow let’s cd into the project, install dependencies and run it. Make sure you have Python 3+ installed.
cd django-contact-form
python3 -m venv env
source env/bin/activate
pip install -r requirements.txtNow let’s run the project.
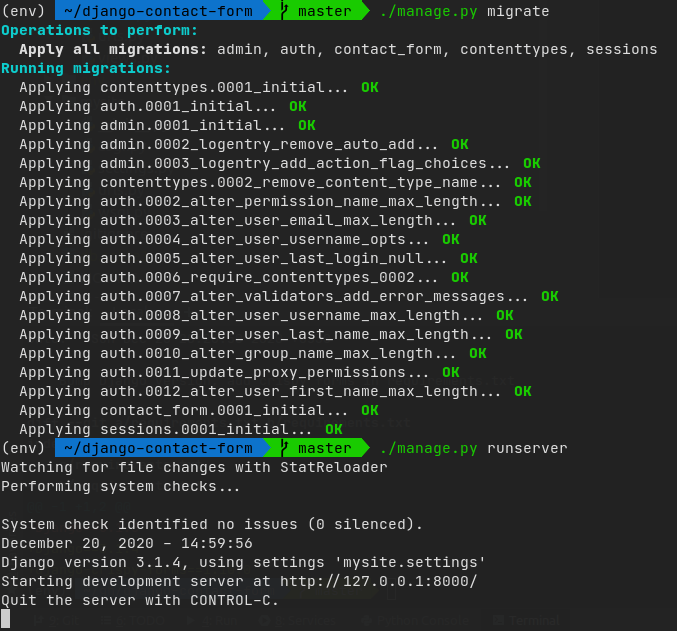
./manage.py migrate
./manage.py runserver 127.0.0.1:8000If all goes well, you should see something like this:
One more thing: since Firefox does not send localhost, or 127.0.0.1 over the proxy, we won’t be able to test it directly over http://127.0.0.1:8000/. We have to get more creative.
A simple solution is to add a new entry to your hosts file. On Mac and Linux, the file is located at /etc/hosts. On Windows, the file is at c:\windows\system32\drivers\etc\hosts
In either case, edit this file (using Notepad -> Run as administrator, then File -> Open on Windows, or sudo vim /etc/hosts on Mac/Linux), and add the following line at the end:
127.0.0.1 localThis will allow us to access our local project at http://local:8000 so that Burp can intercept requests to it. Try it out!
Once you’ve confirmed you can intercept requests to local:8000, let’s intercept the request for contact form submission. Keep Intercept off, then go to the contact page. Fill out some info, turn Intercept on, then click Submit.
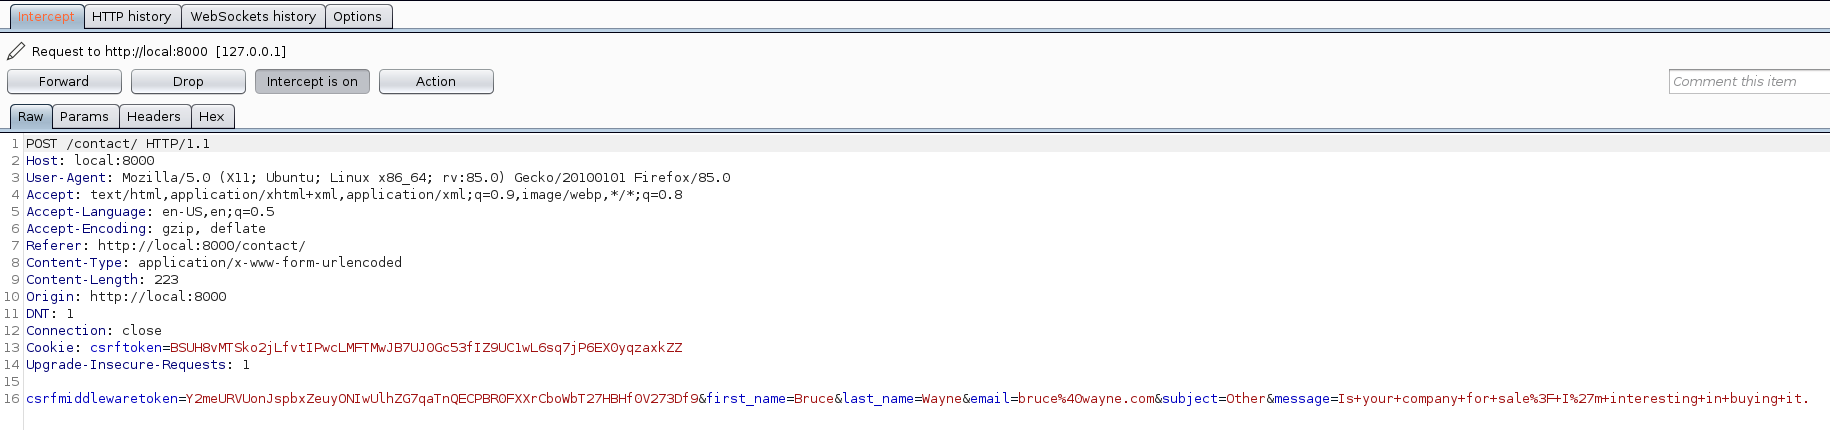
Here, we can see the request being made. At the last line is the form data, encoded as application/www-x-form-urlencoded (basically URL-encoded key-value pairs, separated by ‘&’).
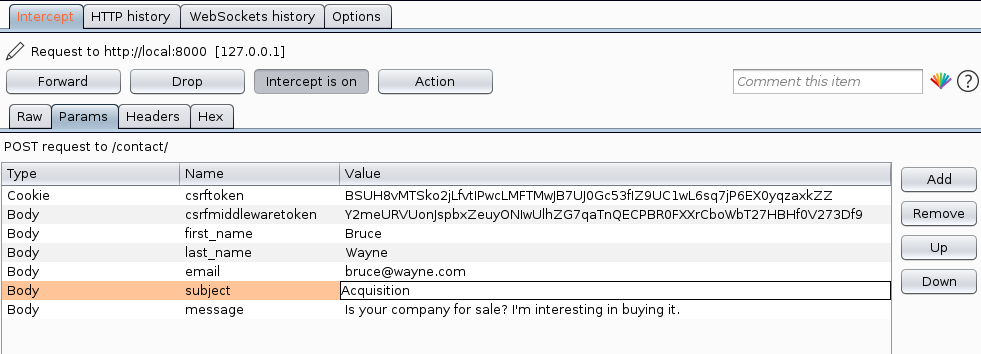
Tip: You can also go to the “Params” tab above to see a more readable version of the same key-value pairs, as you can see below.

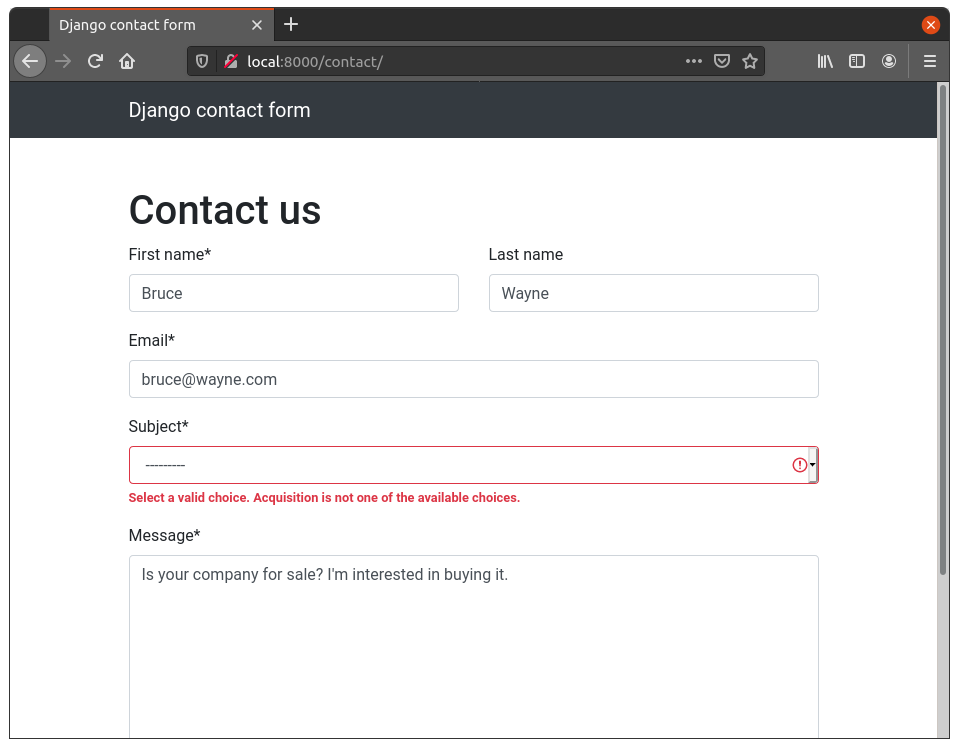
Now let’s make things interesting. Remember: from the dropdown, user can only select among four subjects: Account, Payment, General feedback and Other. But let’s see what happens if we try to change the subject from Burp. Double click the value to edit, and press Enter to save it.
Now let’s Forward the request and turn Intercept off.
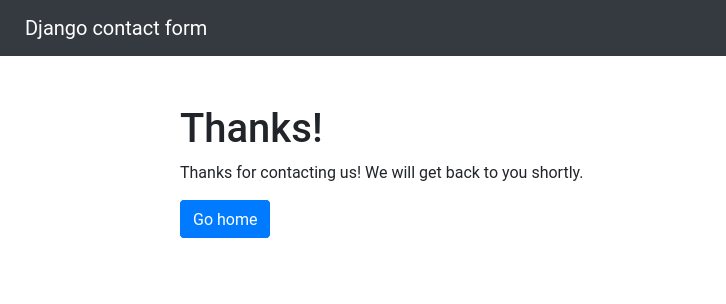
Welp! Looks like the request was successful! Let’s see if it actually got stored that way in our model, shall we?
We’ll need to log into Django’s built-in admin site, but before we can do that, we need to create an admin user.
./manage createsuperuser
Username (leave blank to use 'sumit'): admin
Email address:
Password:
Password (again):
This password is too common.
Bypass password validation and create user anyway? [y/N]: y
Superuser created successfully.If you use a simple password like 123456, the script will warn you about it, but you can ignore it with a ‘y’. (It goes without saying that we wouldn’t be using such a simple password in a real-world scenario.)
Now, let’s log in as admin. Open http://local:8000/admin/ in the browser (make sure Burp’s intercept is turned off) and enter the credentials you mentioned above.
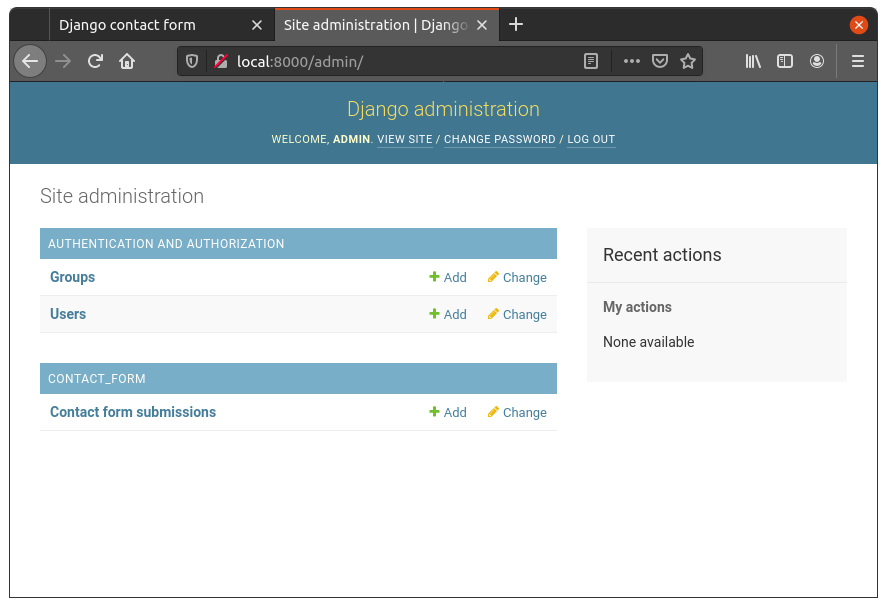
Now let’s go to Contact form submissions.
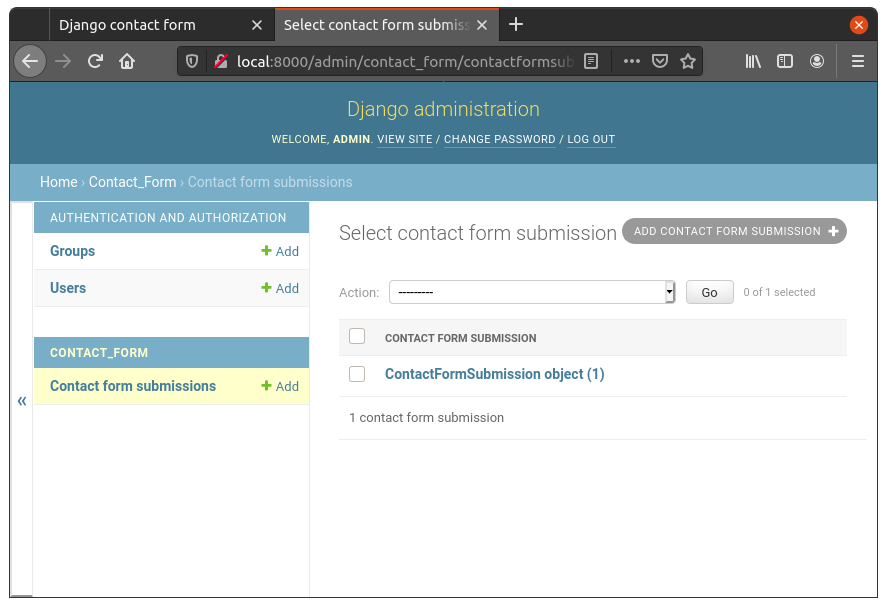
Sure enough, there’s one entry there. Let’s see what we stored.

Well well well, looks like Mr. Wayne bypassed our front-end validation! The subject is indeed Acquisition, even though it wasn’t available in the dropdown.
So, how do we prevent hackers like Mr. Wayne from filling our database with random subjects? Well if you’re familiar with Django, odds are you know there’s a simple solution: choices. Let’s try that.
In the Django app, open contact_form/models.py file and change it as follows:
# contact_form/models.py

from django.db import models


class ContactFormSubmission(models.Model):
    SUBJECT_CHOICES = [
        ('Account',) * 2,
        ('Payment',) * 2,
        ('General feedback',) * 2,
        ('Other',) * 2,
    ]

    first_name = models.CharField(max_length=100)
    last_name = models.CharField(max_length=100, blank=True, default='')
    email = models.EmailField()
    subject = models.CharField(max_length=200, choices=SUBJECT_CHOICES)
message = models.CharField(max_length=3000)Note: we added SUBJECT_CHOICES field, which we then specified to the subject CharField with the choices= parameter.
Let’s make migrations for this (./manage.py makemigrations) and run them (./manage migrate).

Note: here, running migrate won’t actually affect the database in anyway, because subject is still a CharField so it will still be saved as a character data type (like varchar). The only change is in the application code. But we run migrate anyway just so Django remembers that the migration has been run.
Let’s try hacking the contact form once again, in exactly the same way as before. Fill out the form, turn on Intercept, click Submit, change the Subject parameter to “Acquisition” (or whatever random value you please) and turn Intercept off. You should see something like the following.
Yay! Looks like it didn’t work this time. Django performed back-end validation for us, because we specified a list of choices to our field.
Note that this was only one way of solving the problem. You might think that it’s better to export the list of choices into a separate model, and then reference that in ContactFormSubmission, instead of relying on choices. And you’d have a point.
It makes a lot of sense to do that, especially if the Subject is something that’s likely to change in the future. Not only that, but it also adds another layer of validation at the database layer, because of the foreign key constraint. Note that you still want to validate at the application layer, because otherwise your app will crash with a nasty database error, not the obvious red error message you saw above.
Now I realize that this was an really simple example of very obviously bad code, but the point was to demonstrate how Burp can be used. In the real-world, missing validation could be a lot more subtle, but with the right tools (like Burp) and the right mindset (what would an attacker do?), you can find it.
I hope this article was helpful. Please leave a comment if you have any suggestions!
This is the right example, i have applied this to my app and mpos build error and everything is running smoothly. Thanks for sharing the information.
how do i contact you regarding web link shortener it doesnt work on railway